So, picture this: I’m standing in line at the grocery store, minding my own business, contemplating the existential dread of choosing between organic kale and the slightly less-organic, but undeniably cheaper, kale. Suddenly, the person in front of me, let's call her Brenda, whips out a crumpled piece of paper. It looks like a math worksheet. My inner math nerd does a little jig. Brenda, with a sigh that could curdle milk, starts muttering, "Less than, greater than… where does the arrow even point?"
It was a classic number line situation, you know? The kind where you're trying to represent something like "all the numbers greater than 5" or "all the numbers less than or equal to -2." And Brenda, bless her heart, was utterly flummoxed by the visual representation. It got me thinking, because honestly, sometimes these seemingly simple math concepts can feel like trying to navigate a maze blindfolded. But once you get the hang of it, it’s actually pretty darn cool. And that, my friends, is where our little adventure with graph inequalities on a number line begins.
Think of a number line as your own personal, infinite highway. It stretches out forever in both directions, with zero right in the middle, positive numbers zipping off to the right, and negative numbers doing their own thing to the left. It’s a place where numbers can hang out, and where we can show you where certain numbers live and where they don't.
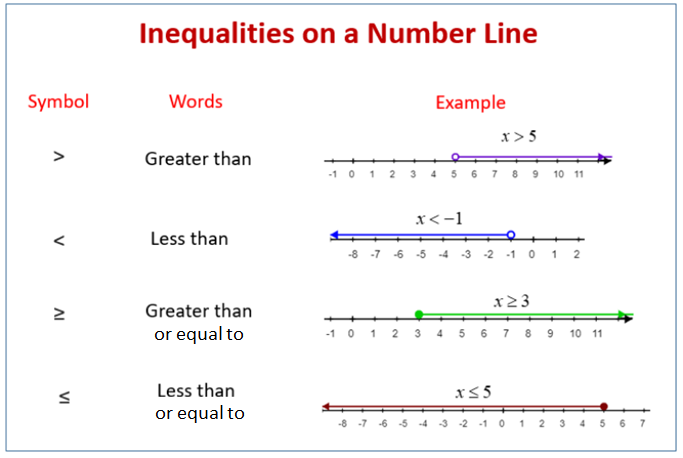
Now, when we talk about inequalities, we’re essentially talking about comparisons. It's like saying, "This number is bigger than that one," or "This number is smaller than something else." You’ve probably seen these symbols before: the sneaky '<' (less than) and the equally sneaky '>' (greater than). And then there are their slightly more accommodating cousins, the '≤' (less than or equal to) and '≥' (greater than or equal to). These little guys are the architects of our number line representations.
Let’s break it down. Imagine you have a budget for delicious, albeit slightly unhealthy, snacks. You decide you can spend at most $10. This means you can spend $10, $9, $5, $0, or any amount less than $10. But you absolutely cannot spend $11 or $15. On a number line, this would be represented as all the numbers from $0$ up to and including $10$. See how the "or equal to" part is important? It means $10$ is a valid option.
Now, what if your parents said you could have more than 3 cookies? This implies you can have 4, 5, 10, or even a ridiculous number of cookies (though I wouldn't recommend that!). But you can't have 3 cookies or 2 cookies. The number 3 itself is off-limits. This is where the strict '>' or '<' symbols come into play.
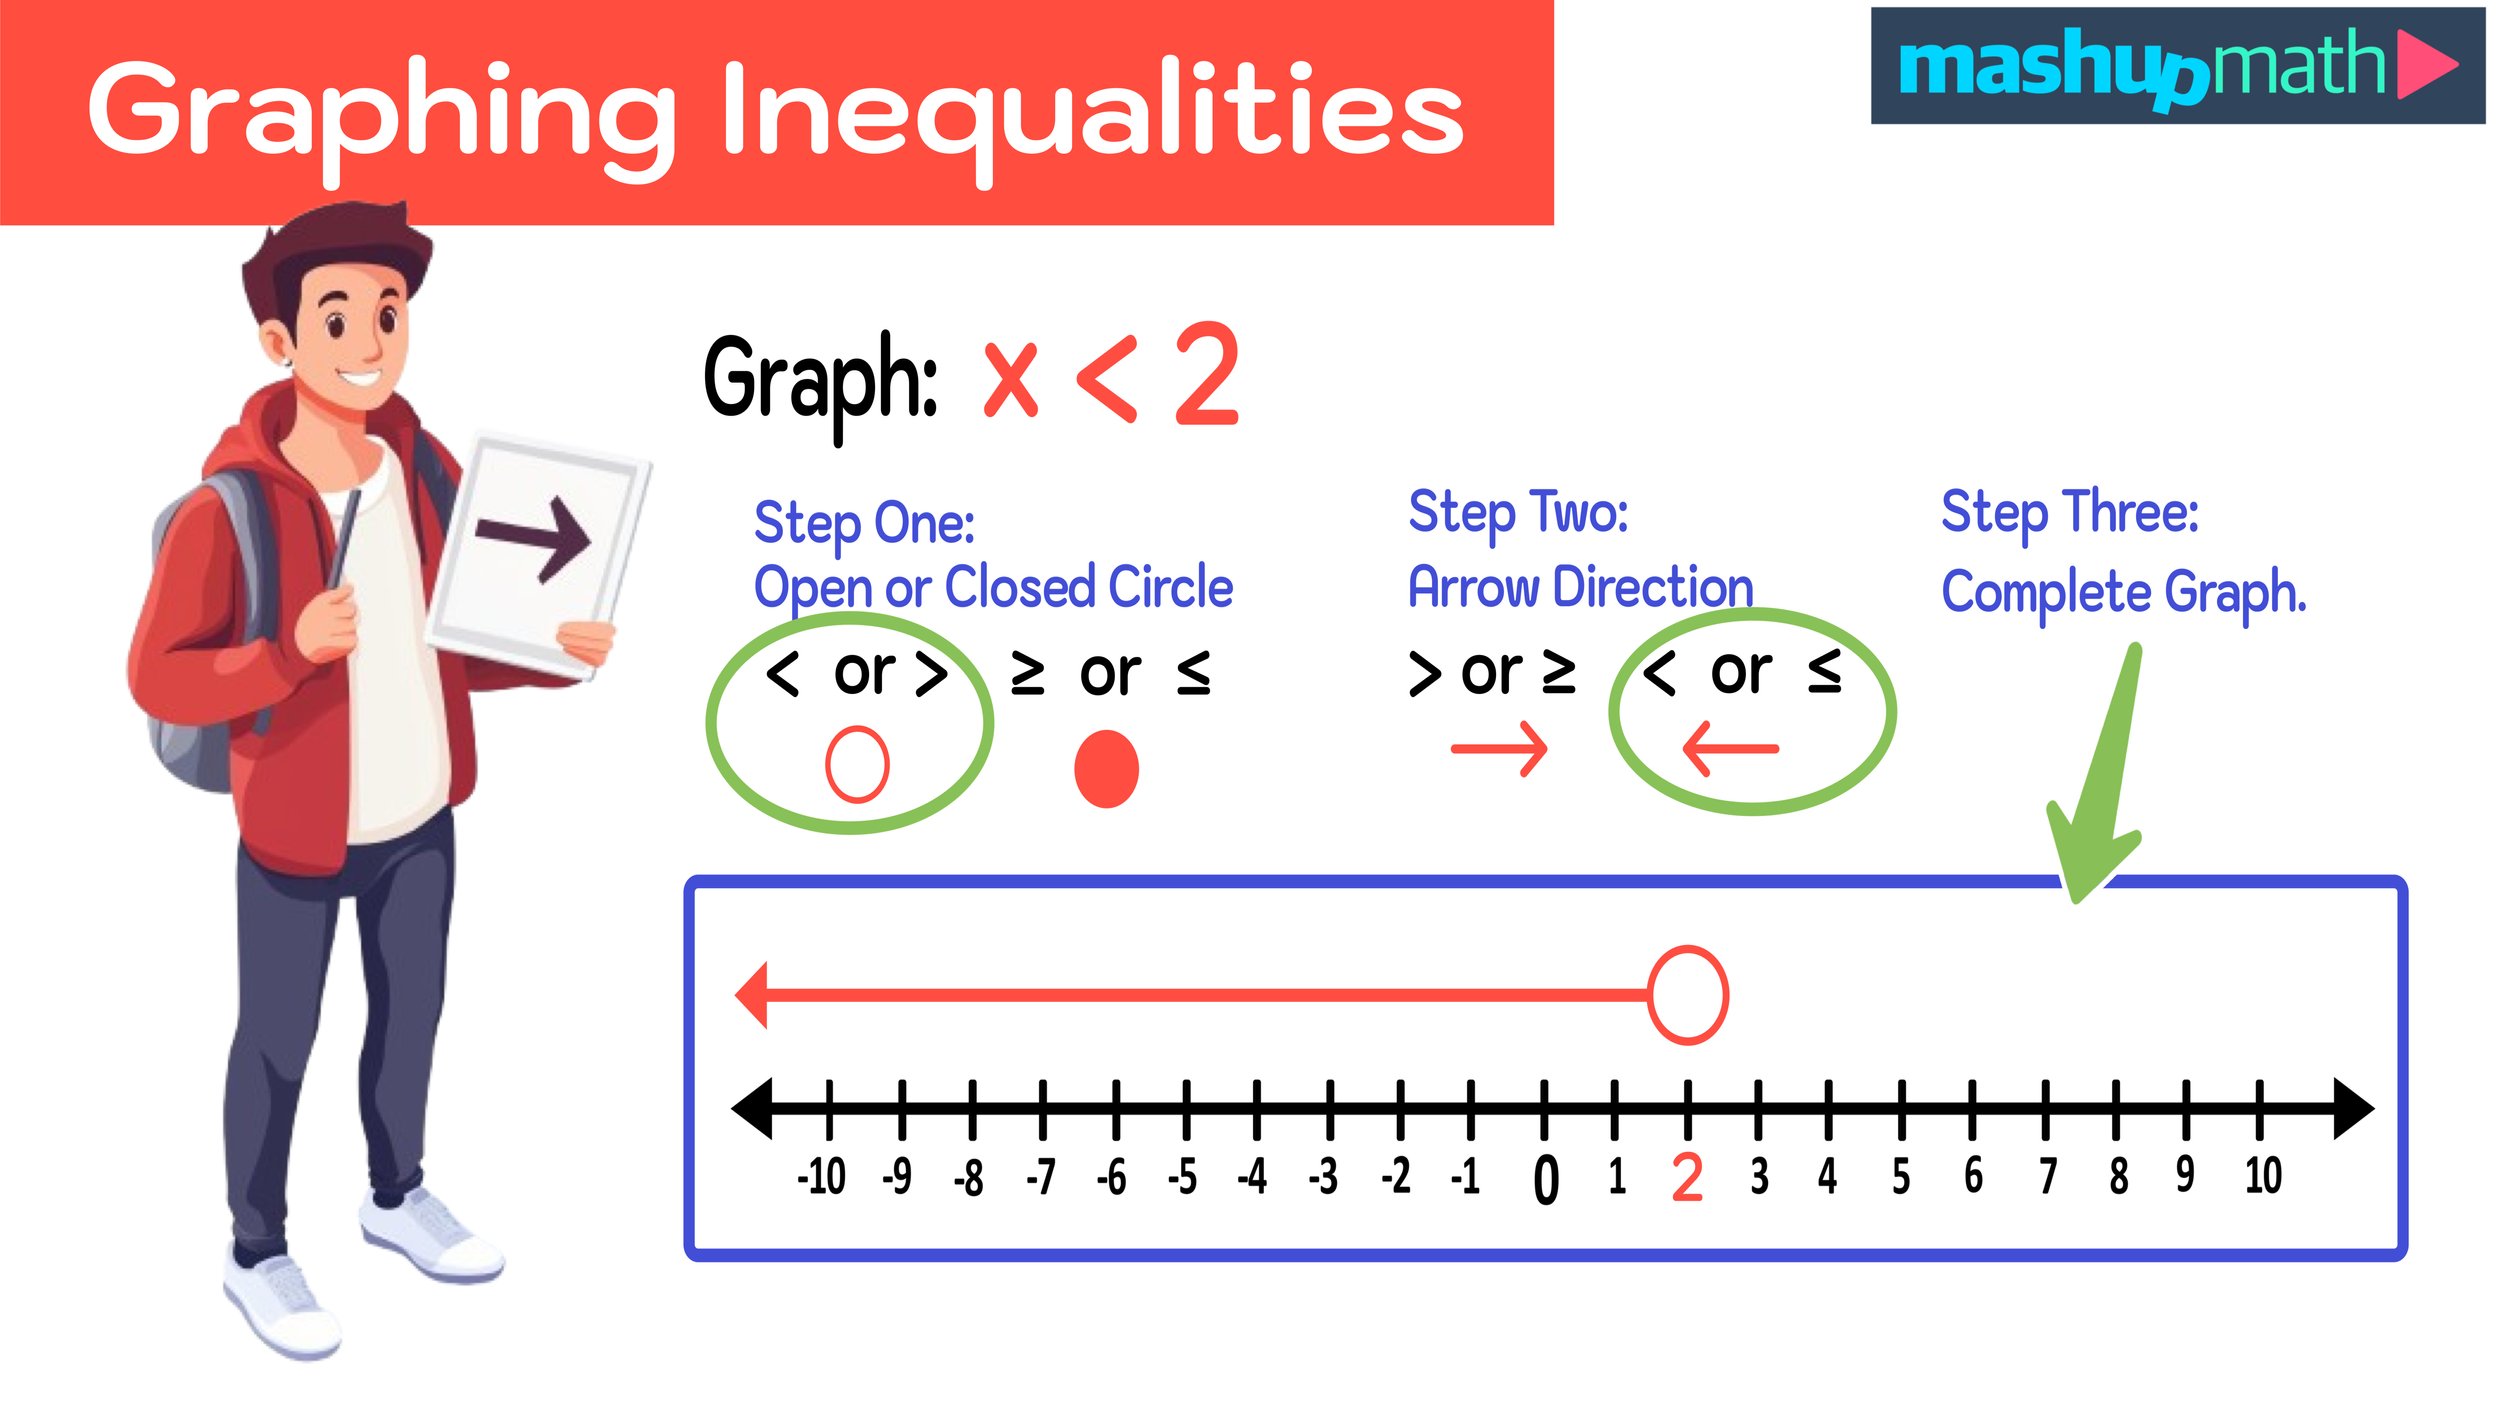
Okay, so how do we actually draw these on our number line highway? This is where the magic happens, and it's surprisingly straightforward once you get the hang of it. We use two key visual cues: open circles and closed circles, and of course, arrows.
The Open Circle vs. The Closed Circle: A Tale of Two Endpoints
Let’s start with the circles. Think of them as little gates on our number line highway. They tell us whether the endpoint is included in our solution set or excluded.
If you see a strict inequality symbol – that’s '<' or '>' – it means the number at the boundary is not part of your solution. It's like saying, "You can have anything up to this point, but not this exact point." For these situations, we use an open circle. It’s like a hollow dot, signaling that the number right there is a no-go. Imagine a fence with a gap in it – you can get close, but not through that exact spot.
On the other hand, if you see '≤' or '≥', it means the number at the boundary is included in your solution. You can have this amount, or more/less. For these, we use a closed circle (or a filled-in dot). This is like a solid gate, indicating that the number is a valid part of your set. Think of it as a sturdy wall you can lean on.
So, the rule of thumb is: open circle for '<' and '>', and a closed circle for '≤' and '≥'. Easy peasy, right?
The Arrow of Direction: Where Does the Solution Road Lead?
Once we've marked our boundary point with the appropriate circle, we need to show which direction the solutions lie. This is where the arrow comes in. It’s like painting a giant arrow on the highway to guide all the numbers that fit your condition.
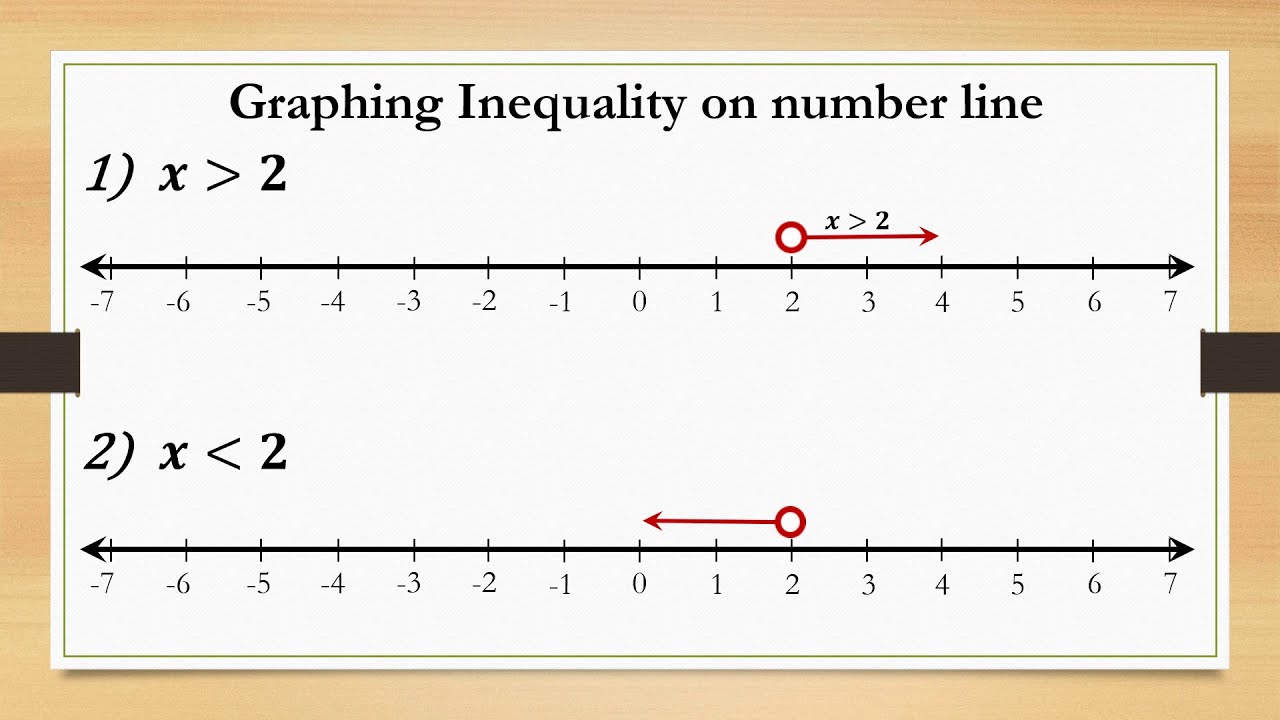
If your inequality is something like x > 3 (x is greater than 3), you want to include all the numbers to the right of 3. So, you would draw an open circle at 3 and then draw an arrow pointing to the right, showing all the numbers like 4, 5, 100, and so on.
Conversely, if your inequality is x < -1 (x is less than -1), you're interested in numbers to the left of -1. You’d place an open circle at -1 and draw your arrow pointing to the left, covering numbers like -2, -5, -1000, etc.
What about the closed circles? If you have x ≤ 5, you put a closed circle at 5 and shade the arrow to the left, because numbers like 4, 0, and -10 are all less than or equal to 5. If it's x ≥ 0, you'd have a closed circle at 0 and shade the arrow to the right, representing 1, 2, 10, and so on.
It’s basically about identifying your starting point (the number in the inequality) and then shading the part of the number line that satisfies the comparison. The arrow acts as your highlighter, making it super clear what numbers are "in" and what numbers are "out."

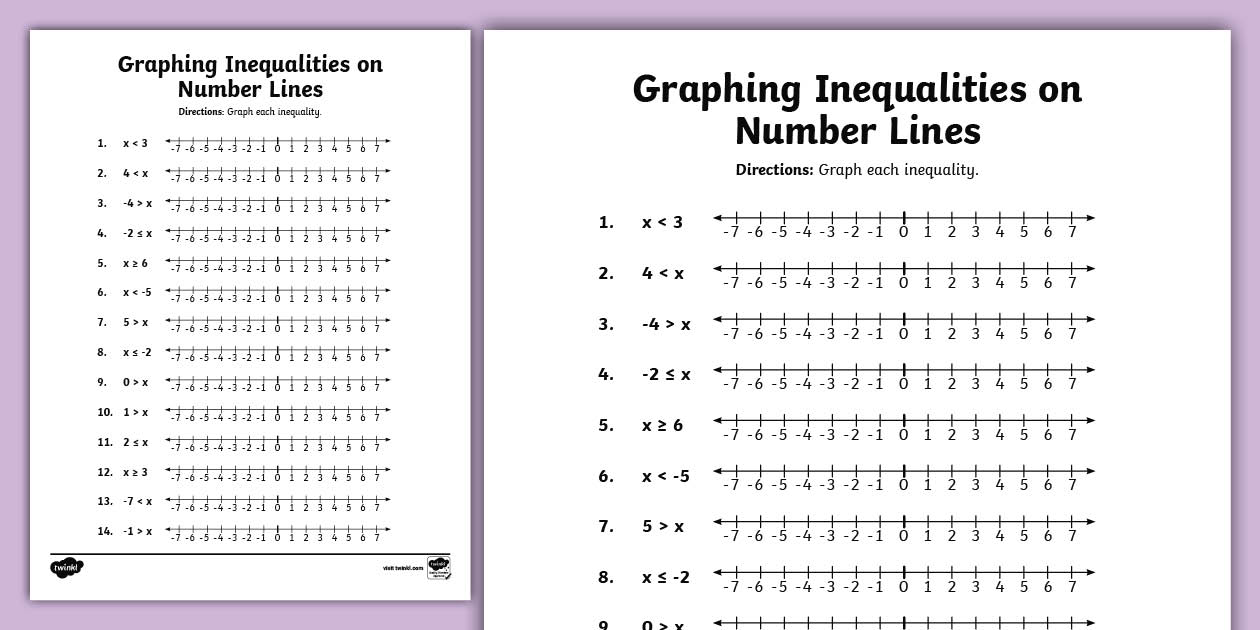
Let’s Get Practical: The Worksheet Experience
Now, imagine you’re staring at a worksheet, and it’s got problems like these:
1. Graph x < 7 on a number line.
2. Graph y ≥ -3 on a number line.
3. Graph a ≤ 0 on a number line.
4. Graph b > 5 on a number line.
For the first one, x < 7, you’d draw your number line, put a tick mark at 7. Since it’s ‘<’ (less than), you put an open circle at 7. And since we want numbers less than 7, your arrow goes to the left. Done and dusted!
For the second, y ≥ -3, draw your number line, find -3. Since it's '≥' (greater than or equal to), you put a closed circle at -3. We want numbers greater than -3, so the arrow points to the right. See? It's like giving directions on your number line highway.
The third, a ≤ 0, is pretty straightforward. Open circle? Nope, it's a closed circle at 0 because of the '≤'. And we want numbers less than or equal to 0, so the arrow heads to the left.
And the last one, b > 5. Strict inequality, so open circle at 5. We want numbers greater than 5, so the arrow marches to the right.
It’s really that simple. You identify the number, decide if the circle is open or closed based on the symbol, and then decide which direction the arrow needs to point to include all the other numbers that satisfy the inequality.
Why Bother? (The Big Picture)
You might be thinking, "Okay, this is neat, but why do I need to do this?" Well, graphing inequalities on a number line is a fundamental skill. It’s the visual language that helps us understand the set of possible solutions.
Think about real-world problems. If you’re trying to figure out how much money you need to save for a new game that costs $60, and you have $20 already, you know you need to save at least $40 more. That’s an inequality: savings ≥ $40. Representing that on a number line instantly shows you all the possible amounts you could save to reach your goal (and even more!).
Or, if a recipe calls for less than 2 cups of flour, and you only have 1.5 cups, you know you’re okay. But if you have 2.5 cups, you’re out of luck for that specific recipe. The number line visually communicates these boundaries.

These graphical representations become even more powerful when you start dealing with systems of inequalities, where you have multiple conditions to satisfy. You're looking for the overlap of shaded regions, the sweet spot where all conditions are met. That’s when the number line becomes your best friend for visualizing complex scenarios.
It’s also a stepping stone to understanding graphs of inequalities in two dimensions (on an x-y plane), which are used to represent much more complex relationships and constraints in fields like economics, engineering, and even computer science. So, mastering the one-dimensional number line is like learning your ABCs before writing a novel.
Common Pitfalls and How to Avoid Them
Now, I’ve seen a few common little slip-ups that can happen. One is mixing up the open and closed circles. Remember: strict symbols (<, >) get open circles; inclusive symbols (≤, ≥) get closed circles. Keep that little mantra in your head!
Another one is pointing the arrow the wrong way. Always ask yourself: "Which numbers are actually greater than/less than my boundary number?" If you're unsure, try plugging a number from the shaded region back into your original inequality. Does it make the statement true? If yes, you're probably golden!
And don't forget to draw your number line with some markings! You don't need to label every single number, but having a few key points (like zero and your boundary number) helps make your graph clear and easy to understand. A little bit of organization goes a long way, even in the wild west of number lines.
Ultimately, practicing with a worksheet is the best way to solidify these concepts. You’ll get faster at recognizing the symbols, drawing the circles, and shading the correct direction. It’s like learning to ride a bike; at first, it’s wobbly, but with practice, you’ll be cruising.
So, the next time you’re faced with a "graph this inequality" problem, don’t panic like Brenda in the grocery line. Just remember your number line highway, your open and closed circles, and your trusty arrow. You've got this!